| Oracle® Database 2 Day DBA 11g Release 1 (11.1) Part Number B28301-01 |
|
|
View PDF |
| Oracle® Database 2 Day DBA 11g Release 1 (11.1) Part Number B28301-01 |
|
|
View PDF |
You may want to create additional Automatic Storage Management (ASM) disk groups to:
Have disk groups with different redundancy levels (normal, high, or external), depending on availability requirements and storage system capabilities.
Separate different classes of storage (for example, SCSI drives and SATA drives) into different disk groups. (Disks in a disk group should have similar size and performance characteristics.)
Store the flash recovery area in a separate disk group from the database.
To create a disk group:
Go to the ASM Home page.
Click the Disk Groups link to display the Disk Groups subpage.
If the Automatic Storage Management Login page appears, log in as the SYS user, connecting as SYSASM. Provide the SYS password for the ASM instance. This password was set up when the ASM instance was created.
Click Create.
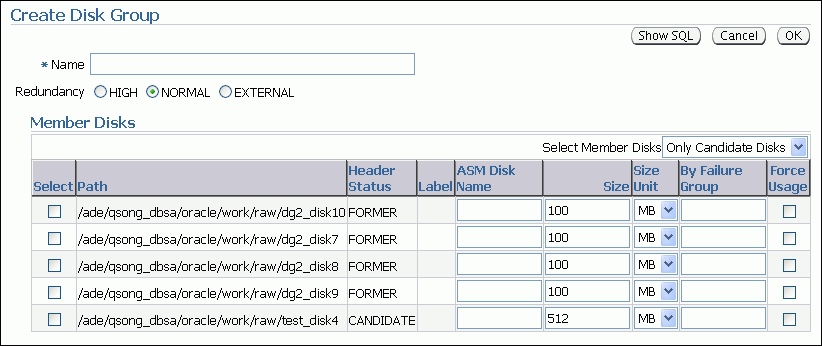
The Create Disk Group page appears. It displays a list of ASM disks that are available to be added to a disk group. This includes disks with the header status of CANDIDATE, PROVISIONED, or FORMER.

If you want to display not only disks that are available to be added to a disk group, but all ASM disks, including disks that already belong to a disk group (header status = MEMBER), select All Disks from the Select Member Disks list.
The page is refreshed and now displays the complete list of ASM disks that were discovered by the ASM instance.
Enter the disk group name, and select redundancy type (high, normal, or external).
Select disks as follows:
Select the check box to the left of each disk that you want to include in the new disk group.
If you want to force the inclusion of a disk in the disk group, select the Force Usage check box for that disk.
Note:
The Force Usage check box causes the disk to be added to the new disk group even if the disk already belongs to another disk group and has valid database data. This data will be lost. You must be certain that you are selecting a disk that can legitimately be added to the disk group. See Oracle Database Storage Administrator's Guide for a discussion of theFORCE option.Optionally enter an ASM disk name for each selected disk. (ASM provides a name if you do not.)
Click OK to create the disk group.
See Also:
Oracle Database Reference for information about the various header statuses of ASM disks.